This guide adapts Ram Vennam's ambient-multicluster-workshop to run entirely on your laptop. Instead of cloud-managed clusters you get two kind clusters with non-overlapping pod/service CIDRs, and instead of a cloud LoadBalancer you get MetalLB serving IPs from the kind Docker bridge network.
The repo contains setup scripts for the kind-specific parts (cluster creation + MetalLB). After those run you follow the upstream workshop steps as-is.
What you'll build
By the end you'll have a live two-cluster ambient mesh on your laptop, and you'll have proved each piece with a real request:
- Bookinfo split across both clusters. Requests cross the cluster boundary over mTLS through the HBONE east-west gateway. Every edge on the Gloo graph carries a lock icon confirming mutual TLS end to end.
- A VM joined to the mesh. A mock VM (a Docker container on the kind network) enrols with its own SPIFFE identity
cluster.local/ns/vm1/sa/vm1and reaches in-cluster services through ztunnel's SOCKS5 proxy. Cluster ztunnel logs showsrc.identityset to the VM. - Identity-based egress. An
AuthorizationPolicyon the egress waypoint letsratingsout tohttpbin.organd blocksreviews, both from the same namespace. One curl succeeds, the other is denied. - A targeted deny on the VM. A
DENYmatching only the VM's identity blocks vm1 while every in-cluster bookinfo service keeps working. The VM getsRBAC: access denied; the browser still loads the app.
Architecture
  ┌──────────────────────────┐    HBONE (port 15008)    ┌──────────────────────────┐
  │  kind-east               │ ◄──────────────────────► │  kind-west               │
  │                          │                          │                          │
  │  pods: 10.10.0.0/16      │  Istio EastWest Gateway  │  pods: 10.20.0.0/16      │
  │  svcs: 10.96.0.0/16      │                          │  svcs: 10.97.0.0/16      │
  │  lb pool: .200-.210      │                          │  lb pool: .220-.230      │
  │                          │                          │                          │
  │  Istio Ingress GW        │                          │  Istio Ingress GW        │
  │  ztunnel (DaemonSet)     │                          │  ztunnel (DaemonSet)     │
  │  istiod (control plane)  │                          │  istiod (control plane)  │
  └──────────────────────────┘                          └──────────────────────────┘
         │                                                       │
         └──────────────────── Docker bridge ────────────────────┘
IP layout
| Cluster | Pod CIDR | Service CIDR | MetalLB pool |
|---|---|---|---|
| $CLUSTER1 (kind-east) | 10.10.0.0/16 |
10.96.0.0/16 |
<base>.255.200 – 210 |
| $CLUSTER2 (kind-west) | 10.20.0.0/16 |
10.97.0.0/16 |
<base>.255.220 – 230 |
MetalLB pool ranges are derived at runtime from the kind Docker network CIDR
(detected by scripts/02-metallb.sh via docker network inspect kind).
<base> is the first two octets of that CIDR — e.g. 172.22 if kind
got 172.22.0.0/16. Both pools sit well above the node IPs so they are reachable
from both clusters without any extra routing.
Prerequisites
./scripts/install-prereqs.sh to audit what's missing, or
./scripts/install-prereqs.sh --install to grab everything
via Homebrew (macOS — installs Homebrew itself if needed). Solo
istioctl is fetched into ~/.istioctl/bin by the
same --install pass.
GLOO_MESH_VERSION=v2.12.3 sh /tmp/meshctl-install.sh
export PATH=$HOME/.gloo-mesh/bin:$PATH
Install Solo istioctl
Upstream istioctl (homebrew, istio.io) is missing the multicluster and bootstrap subcommands the labs use. The shared installer downloads the Solo build into ~/.istioctl/bin — it has a public REPO_KEY baked in as the default so you don't need to set anything.
About — what this does & why
What: Auto-detects your host OS + arch, downloads the Solo istioctl tarball, validates it's a real gzip archive (so a wrong key fails fast with a clear error instead of a confusing tar: Unrecognized archive format), and extracts the binary into ~/.istioctl/bin.
Why: Multi-cluster lab steps call istioctl multicluster check, multicluster expose, and bootstrap — none of which exist in the upstream istioctl. Run the script once at the repo root and you're set for every Solo lab on this machine.
# From the solo-demos repo root — REPO_KEY defaults to the public e6283d67ad60.
# install-prereqs.sh --install installs the Solo istioctl into ~/.istioctl/bin
# alongside the rest of the brew-managed prereqs.
./scripts/install-prereqs.sh --install

# Or pin a specific Istio version (default 1.29.2):
ISTIO_VERSION=1.29.3 ./scripts/install-prereqs.sh --install

# Then add the binary to your PATH (zsh: ~/.zshrc, bash: ~/.bashrc):
export PATH="$HOME/.istioctl/bin:$PATH"

# Verify
istioctl version --short
istioctl multicluster check --helpHow this repo differs from the upstream workshop
| Step | Upstream (cloud) | → | This repo (kind) |
|---|---|---|---|
| Cluster creation | Cloud provider CLI (GKE / EKS / AKS) | → | scripts/01-clusters.sh — runs kind create cluster with preset CIDRs |
| LoadBalancer IPs | Cloud LB (automatic) | → | scripts/02-metallb.sh — installs MetalLB + applies non-overlapping IP pools |
| Egress gateway kubectl commands | Missing --context flags throughout the egress section |
→ | See "Workshop fixes" section below — corrected commands with --context=$CLUSTER1 |
| productpage curl | MetalLB IP routable on cloud | → | MetalLB IP is on Docker bridge — not reachable from macOS host. Use kubectl port-forward instead — see "Workshop fixes" section |
| VM workload | A real bare-metal or cloud VM | → | See "Adding a mock VM" section below — Docker container on the kind network |
| Everything else | Follow rvennam/ambient-multicluster-workshop exactly | ||
Setup
Clone both repos
Clone this repo (kind-specific scripts) and Ram's workshop side by side — you'll be switching between them throughout the lab:
About — what this does & why
What: Clones the kind-specific setup repo (this guide's scripts and configs) and Ram Vennam's upstream ambient-multicluster-workshop side by side.
Why: The kind scripts handle laptop-specific concerns (cluster creation, MetalLB pools) that the upstream workshop skips because it assumes a cloud provider. You'll bounce between the two: kind scripts for steps 2–3, then the upstream README from step 4 onward with the fixes below.
# Kind-specific setup scripts (this guide)
git clone git@github.com:tjorourke/solo-labs.git
cd solo/istio-gw-multi-cluster-kind

# Upstream workshop (open alongside this guide)
git clone https://github.com/rvennam/ambient-multicluster-workshop
You'll run the kind scripts first (Steps 2–3 below), then follow Ram's workshop with the fixes documented in the "Workshop fixes for kind" section.
Set cluster variables, then create the clusters
Set these first — both scripts read them, and so does the entire workshop:
About — what this does & why
What: Exports two shell variables that name the kind kubeconfig contexts (kind-east and kind-west) for the rest of the lab.
Why: Every kubectl --context=$CLUSTER1 / $CLUSTER2 command in this guide and the upstream workshop reads these. Export them in every new terminal — without them most commands either error out or silently target the wrong cluster.
export CLUSTER1=kind-east
export CLUSTER2=kind-west
Now create both clusters. The script reads $CLUSTER1 and $CLUSTER2,
strips the kind- prefix to get the cluster name, and looks up the matching config
in kind/.
About — what this does & why
What: Creates two kind clusters (east and west) using preset configs that lock in non-overlapping pod and service CIDRs (10.10.0.0/16 + 10.96.0.0/16 on east; 10.20.0.0/16 + 10.97.0.0/16 on west).
Why: Ambient multicluster needs each cluster's pod and service CIDRs to be unique so the remote cluster can resolve endpoints without collision. The default kind create cluster would hand both clusters the same CIDRs and break cross-cluster routing.
./scripts/01-clusters.shExpected output — two new contexts in ~/.kube/config:
  ✓ cluster 'east' ready
  ✓ cluster 'west' ready

Contexts:
*  kind-east   ← $CLUSTER1
kind-west ← $CLUSTER2Install MetalLB and configure IP pools
Replaces the cloud LoadBalancer. MetalLB v0.14.9 is installed on both clusters. Non-overlapping IP address pools let both east-west gateways get stable IPs reachable from both clusters.
About — what this does & why
What: Installs MetalLB v0.14.9 on both clusters and configures each with a distinct IP pool carved out of the kind Docker bridge network (e.g. 172.22.255.200–210 for east, 172.22.255.220–230 for west).
Why: The upstream workshop relies on cloud LoadBalancers to give the Istio east-west gateway a routable IP. On kind there's no cloud LB, so MetalLB plays that role by handing out IPs from the shared Docker bridge — both clusters can then reach each other's east-west gateway directly.
./scripts/02-metallb.shExpected output:
  ✓ MetalLB installed
  ✓ controllers ready
  ✓ pools applied

LoadBalancer services:
  east  ...   (none yet — they appear after Istio installs the east-west GW)
west ... (none yet)cloud-provider-kind has a macOS bug where it fails to
write the assigned IP back to status.loadBalancer.ingress. MetalLB works reliably.
Set cluster env vars, then follow the upstream workshop
Switch into the workshop directory you cloned in Step 1:
About — what this does & why
What: Changes into the cloned upstream workshop directory so its relative paths (gloo-extensions.yaml, sample manifests, etc.) resolve correctly.
Why: From here on you're driving the upstream workshop, not this guide's scripts. The "Workshop fixes for kind" section below patches a handful of commands; everything else in Ram's README is run as-is from this directory.
cd ambient-multicluster-workshopThe workshop covers:
- Installing Istio in ambient mode on both clusters
- Setting up a shared root CA + per-cluster intermediates
- Creating east-west gateways (MetalLB will assign IPs automatically)
- Enabling cross-cluster endpoint discovery
- Deploying the Bookinfo sample app across both clusters
- Verifying cross-cluster traffic with
ztunnelL4 and waypoint L7 policy - Egress gateway policy
- Bring a VM into the mesh
→ Open ambient-multicluster-workshop on GitHub
--context
flags, and the VM bootstrap token needs a workaround on kind.
Open k9s tabs (macOS)
Opens two Terminal tabs with k9s — one per cluster — for easy side-by-side monitoring.
About — what this does & why
What: Uses AppleScript to open two new Terminal tabs and launches k9s --context=kind-east in one and k9s --context=kind-west in the other.
Why: The whole point of multicluster is watching two clusters react to the same operation. Having both k9s sessions open side by side makes it obvious when, for example, ztunnel on east logs an HBONE connection from a pod on west.
./scripts/k9s-tabs.shWorkshop fixes for kind
These sections in the upstream workshop need replacements on kind. When you reach each section, use the commands below instead of what the upstream README shows.
Install Istio on both clusters using Gloo Operator
After the helm install gloo-operator step and before applying the
ServiceMeshController CR, apply the gloo-extensions ConfigMap to both clusters.
The operator reads it at istiod install time — if you apply it after istiod is already running,
you must restart the istiod pod for the setting to take effect.
About — what this does & why
What: Loops over both contexts and applies the gloo-extensions ConfigMap, which sets REQUIRE_3P_TOKEN: false on the Gloo Operator's istiod install.
Why: kind's kubelet only issues first-party service-account tokens. By default istiod's VM ztunnel onboarding flow demands a third-party (audience-scoped) token and rejects the VM. Cloud-managed kubelets (GKE, EKS) issue these natively so the upstream workshop never hits this; on kind you have to relax the requirement explicitly, and it must be in place before istiod first starts.
for context in ${CLUSTER1} ${CLUSTER2}; do
  kubectl --context=${context} apply -f gloo-extensions.yaml
doneREQUIRE_3P_TOKEN: false in this ConfigMap, istiod rejects the VM ztunnel
connection. GKE and EKS issue third-party tokens natively so the upstream workshop skips this —
it is not in the helm chart and must be applied manually.
Peer the clusters together
Run istioctl multicluster expose only after istiod is fully ready — it queries
istiod directly to determine the network name. If you run it too early you get:
Error: failed to find network: no "topology.istio.io/network" label foundWait for all istiod pods to be Running first:
About — what this does & why
What: Waits for the istiod pod in each cluster to report condition=ready, then runs istioctl multicluster expose on each context to create the east-west Gateway in istio-gateways.
Why: istioctl multicluster expose queries istiod over XDS to learn the cluster's network name (the value of the topology.istio.io/network label on istio-system). If istiod isn't fully reconciled yet, it returns no network and the command aborts. Waiting on the ready condition first removes that race.
kubectl --context=${CLUSTER1} -n istio-system wait --for=condition=ready pod -l app=istiod --timeout=120s
kubectl --context=${CLUSTER2} -n istio-system wait --for=condition=ready pod -l app=istiod --timeout=120s

istioctl --context=${CLUSTER1} multicluster expose -n istio-gateways
istioctl --context=${CLUSTER2} multicluster expose -n istio-gatewaysEnable productpage to be multi-cluster on both clusters
The upstream README tests with:
About — what this does & why
What: The upstream test command — read the LoadBalancer IP / hostname from the bookinfo-gateway-istio Service's status, then curl productpage on that address.
Why: Shown here as context for what fails on kind, not for you to run. The MetalLB IP this resolves to (e.g. 172.22.x.x) lives on the Docker bridge and is unreachable from the macOS host without extra routing. The replacement command below uses kubectl port-forward instead.
curl $(kubectl get svc -n bookinfo bookinfo-gateway-istio --context $CLUSTER1 \
  -o jsonpath="{.status.loadBalancer.ingress[0]['hostname','ip']}")/productpage
On kind, MetalLB assigns IPs from the Docker bridge network (172.22.x.x) which
is not routable from the macOS host. The curl times out. Use kubectl port-forward
instead:
About — what this does & why
What: Port-forwards the bookinfo-gateway-istio Service on east to localhost:8080, then curls /productpage through it.
Why: kubectl port-forward tunnels through the Kubernetes API server, which is published on the host loopback by kind — so it works on macOS regardless of how Docker bridges are routed. This proves the ingress + bookinfo cross-cluster path end to end without depending on bridge-network reachability.
kubectl --context=${CLUSTER1} -n bookinfo port-forward svc/bookinfo-gateway-istio 8080:80 &
curl http://localhost:8080/productpage
Kill the port-forward when done: kill %1
Egress Gateway
The upstream README says "This section will only use $CLUSTER1" but omits
--context from every kubectl call. Replace the entire section with the
following — the commands are identical, just with --context=$CLUSTER1 added:
Create namespace and deploy the egress gateway
About — what this does & why
What: Creates an istio-egress namespace, deploys a Gateway with gatewayClassName: istio-waypoint listening on HBONE port 15008, and labels the namespace istio.io/use-waypoint=egress-gateway so traffic from it gets steered through the waypoint.
Why: A waypoint Gateway in egress mode acts as an L7 chokepoint for outbound traffic. It's where you attach AuthorizationPolicy in the next step — only specific identities (e.g. ratings) get allowed out to specific external hosts. Without it, ambient pods can call any external address with no policy enforcement.
kubectl --context=$CLUSTER1 create namespace istio-egress

kubectl --context=$CLUSTER1 apply -f - <<EOF
apiVersion: gateway.networking.k8s.io/v1
kind: Gateway
metadata:
  name: egress-gateway
  namespace: istio-egress
spec:
  gatewayClassName: istio-waypoint
  listeners:
  - name: mesh
    port: 15008
    protocol: HBONE
    allowedRoutes:
      namespaces:
        from: All
EOF

kubectl --context=$CLUSTER1 label ns istio-egress istio.io/use-waypoint=egress-gateway
Define httpbin.org as an external host and apply AuthorizationPolicy
About — what this does & why
What: Registers httpbin.org as a ServiceEntry labelled for the egress waypoint, adds a DestinationRule to upgrade the outbound connection to TLS, and applies an AuthorizationPolicy that allows only the bookinfo-ratings service account to reach it.
Why: The ServiceEntry makes httpbin.org a first-class mesh destination so the egress waypoint can apply policy to it. The DestinationRule originates TLS at the waypoint (the workload talks plain HTTP to :80, the waypoint negotiates HTTPS to :443). The AuthorizationPolicy is the actual control: identity-based allow-listing of who in the mesh is permitted to call this external host.
kubectl --context=$CLUSTER1 apply -f - <<EOF
apiVersion: networking.istio.io/v1
kind: ServiceEntry
metadata:
  name: httpbin.org
  namespace: bookinfo
  labels:
    istio.io/use-waypoint: egress-gateway
    istio.io/use-waypoint-namespace: istio-egress
spec:
  hosts:
  - httpbin.org
  ports:
  - number: 80
    name: http
    protocol: HTTP
    targetPort: 443
  resolution: DNS
---
apiVersion: networking.istio.io/v1
kind: DestinationRule
metadata:
  name: httpbin.org-tls
  namespace: bookinfo
spec:
  host: httpbin.org
  trafficPolicy:
    tls:
      mode: SIMPLE
---
apiVersion: security.istio.io/v1
kind: AuthorizationPolicy
metadata:
  name: ratings-to-httpbin
  namespace: bookinfo
spec:
  targetRefs:
  - kind: ServiceEntry
    group: networking.istio.io
    name: httpbin.org
  action: ALLOW
  rules:
  - from:
    - source:
        principals: ["cluster.local/ns/bookinfo/sa/bookinfo-ratings"]
EOF
Test
About — what this does & why
What: Execs into a ratings pod and curls httpbin.org/get (expected to succeed), then execs into a reviews pod and runs the same curl (expected to be blocked).
Why: Demonstrates that the egress AuthorizationPolicy is enforced at the waypoint based on the caller's SPIFFE identity, not its source IP. Both pods sit in the same namespace on the same network — only the service-account principal differs, and only the allow-listed one gets through.
# Should succeed — ratings is allowed
kubectl --context=$CLUSTER1 exec -it \
  $(kubectl --context=$CLUSTER1 get pod -l app=ratings -n bookinfo -o jsonpath='{.items[0].metadata.name}') \
  -n bookinfo -- curl -s httpbin.org/get

# Should be blocked — reviews is not in the allow list
kubectl --context=$CLUSTER1 exec -it \
  $(kubectl --context=$CLUSTER1 get pod -l app=reviews -n bookinfo -o jsonpath='{.items[0].metadata.name}') \
  -n bookinfo -- curl -s httpbin.org/get
Adding a mock VM (Docker)
The upstream workshop expects a real VM reachable on the network. On kind, we simulate this
with a Docker container attached to the kind bridge network — it behaves
identically from Istio's perspective: it gets an IP on the shared Docker bridge, ztunnel runs
inside it, and the mesh sees it as a VM workload.
Create the Kubernetes namespace and service account for the VM
The VM will authenticate to istiod using a token bound to this service account.
About — what this does & why
What: Creates a vm1 namespace and a vm1 ServiceAccount inside it on cluster $CLUSTER1.
Why: The VM's mesh identity comes from a service-account token, not its IP or hostname. Once the VM is enrolled, istiod issues it a SPIFFE identity of the form cluster.local/ns/vm1/sa/vm1, which any AuthorizationPolicy can match. This is what makes a non-Kubernetes workload a first-class citizen of the mesh.
kubectl --context=$CLUSTER1 create namespace vm1
kubectl --context=$CLUSTER1 create serviceaccount vm1 -n vm1Build the mock-VM Docker image
We need an Ubuntu container with Docker installed (ztunnel runs as a container inside the
"VM"). The --privileged flag is required so dockerd can run nested
inside the container.
Save this as Dockerfile.vm:
About — what this does & why
What: An Ubuntu 22.04 image with curl, ca-certificates, iproute2, ping, dig, and the Docker CE engine baked in.
Why: The "VM" needs Docker because ztunnel is shipped as a Docker image, and on a real VM you'd run docker run to start it. Recreating that environment in a container (Docker-in-Docker) keeps the workshop steps identical to the real-VM flow without provisioning actual hardware.
FROM ubuntu:22.04
RUN apt-get update -qq && \
    apt-get install -y -qq curl ca-certificates iproute2 iputils-ping dnsutils && \
    curl -fsSL https://get.docker.com | sh && \
    rm -rf /var/lib/apt/lists/*
Build it:
About — what this does & why
What: Builds the Dockerfile.vm from the previous step and tags the resulting image vm-with-docker.
Why: Local-only image, so no push to a registry needed. The next step references this tag when starting the mock VM container.
docker build -t vm-with-docker -f Dockerfile.vm .Run the mock VM container on the kind network
Attaching to the kind Docker bridge puts this container on the same L2 segment
as the kind nodes. MetalLB IPs are reachable directly — no extra routing needed.
About — what this does & why
What: Removes any previous vm1 container, then starts a fresh one attached to the kind Docker network in --privileged mode. Inside, it boots dockerd with the vfs storage driver and parks the container alive with sleep infinity.
Why: Attaching to the kind network gives the "VM" an IP on the same L2 segment as the cluster nodes and the east-west gateway — same network plane a real on-prem VM would sit on. --privileged is required for Docker-in-Docker; vfs avoids the nested overlay2 failure that bites on most stock setups.
docker rm -f vm1 2>/dev/null || true

docker run -d \
  --name vm1 \
  --network kind \
  --privileged \
  --hostname vm1 \
  vm-with-docker \
  sh -c "dockerd --storage-driver=vfs > /var/log/dockerd.log 2>&1 & sleep infinity"
Verify the container is running and has an IP on the kind network:
About — what this does & why
What: Asks Docker for the IP address the vm1 container was given on its attached networks (just one — the kind bridge).
Why: You'll need this IP when you create the WorkloadEntry in VM STEP 7 — it's the address field that tells the mesh where the VM lives. Also a quick sanity check that the container joined the kind network rather than Docker's default bridge.
docker inspect vm1 --format '{{range .NetworkSettings.Networks}}{{.IPAddress}}{{end}}'You should see an IP on the kind Docker bridge network.
Now wait for dockerd to finish its startup sequence inside the container before
proceeding — it takes a few seconds on first run. Poll until docker info
succeeds:
About — what this does & why
What: Polls docker info inside the vm1 container every two seconds until it returns successfully.
Why: Nested dockerd takes several seconds to initialise its vfs graph driver on first start. Running the ztunnel docker run before dockerd is ready fails with a confusing "Cannot connect to the Docker daemon" error. This poll blocks until the inner daemon is up.
docker exec vm1 sh -c 'until docker info >/dev/null 2>&1; do echo "waiting for dockerd..."; sleep 2; done && echo "dockerd ready"'--storage-driver=vfs? Nested Docker (Docker running inside
a Docker container) can't use the default overlay2 driver because the outer
container's filesystem isn't a real block device. vfs is slower but works
everywhere — it copies the entire layer on each write. For a demo VM this is fine.
If you see failed to start daemon: error initializing graphdriver: driver not supported
in the logs, check that --storage-driver=vfs is present.
Check the dockerd log if anything looks wrong:
About — what this does & why
What: Prints the last 20 lines of the nested dockerd's log file (which the docker run redirected to /var/log/dockerd.log inside the container).
Why: First place to look when the poll above hangs. The most common failure is the overlay2 graphdriver error (fixed by ensuring --storage-driver=vfs made it into the docker run command).
docker exec vm1 cat /var/log/dockerd.log | tail -20Generate the bootstrap token
Run this from your host shell (not inside the VM). Requires Solo's istioctl:
About — what this does & why
What: Points PATH at the Solo istioctl binary, then runs istioctl bootstrap for the vm1 service account and captures the resulting JWT into $BOOTSTRAP_TOKEN.
Why: istioctl bootstrap is the Solo-extension command that mints a long-lived service-account token plus the istiod address, CA address, trust domain, and east-west GW IP — everything ztunnel needs to join the mesh. Only Solo's istioctl ships this subcommand; the upstream istioctl does not.
export PATH=~/.istioctl/bin:$PATH

BOOTSTRAP_TOKEN=$(istioctl --context=$CLUSTER1 \
  bootstrap --namespace vm1 --service-account vm1)

echo "BOOTSTRAP_TOKEN length: ${#BOOTSTRAP_TOKEN}"
Copy the value of $BOOTSTRAP_TOKEN — you'll paste it inside the VM in the next step.
Shell into the VM and start ztunnel
Open a shell inside the mock VM:
About — what this does & why
What: Opens an interactive bash session inside the vm1 container.
Why: Everything from here until VM STEP 6's "exit" is run inside the mock VM — the ztunnel docker run, the SOCKS5 curl tests, all of it. From the mesh's perspective these commands are being executed on a VM that's joined the mesh, not on the host.
docker exec -it vm1 bash
Inside the container, set the patched token and run ztunnel. ztunnel needs
--network=host so it can intercept traffic on the VM's own network interfaces.
ALWAYS_TRAVERSE_NETWORK_GATEWAY=true tells it to route traffic through the
east-west gateway rather than trying a direct pod-to-pod path.
First, set the token (replace with your patched value):
About — what this does & why
What: Sets the BOOTSTRAP_TOKEN environment variable inside the VM to the value generated on the host in VM STEP 4.
Why: BOOTSTRAP_TOKEN is a separate shell from the host one, so the variable does not propagate automatically. ztunnel reads this env var on startup to authenticate to istiod and pull its initial config.
export BOOTSTRAP_TOKEN="<paste BOOTSTRAP_TOKEN here>"Then run ztunnel:
About — what this does & why
What: Starts the Solo ztunnel container inside the VM with --network host, --privileged, and the two env vars BOOTSTRAP_TOKEN and ALWAYS_TRAVERSE_NETWORK_GATEWAY=true.
Why: --network host lets ztunnel intercept the VM's actual traffic (rather than only its container namespace's), --privileged is required for the iptables / eBPF redirect rules ztunnel installs, and ALWAYS_TRAVERSE_NETWORK_GATEWAY=true forces outbound mesh traffic through the east-west GW HBONE port instead of attempting a direct pod-to-pod path that wouldn't work from outside the cluster.
docker run -d \
  --name ztunnel \
  --network host \
  --privileged \
  -e BOOTSTRAP_TOKEN="${BOOTSTRAP_TOKEN}" \
  -e ALWAYS_TRAVERSE_NETWORK_GATEWAY=true \
  us-docker.pkg.dev/gloo-mesh/istio-e6283d67ad60/ztunnel:1.29.0-solo-distroless
Check ztunnel logs to confirm it connected to istiod:
About — what this does & why
What: Greps ztunnel's stdout for the lines that prove it joined the mesh: XDS stream up, license accepted, readiness reached.
Why: If Stream established never appears, the bootstrap token is wrong, expired, or the east-west GW is unreachable. If license shows anything other than OK, the Solo licence on istiod isn't entitled for VM workloads. Surfaces the failure mode quickly without trawling the full log.
docker logs ztunnel 2>&1 | grep -E 'Stream established|license|ready|error|WARN'A successful startup looks like:
info    xds::client:xds{id=1}    Stream established
info    xds::client:xds{id=1}    detected license    state=OK
info readiness Task 'state manager' complete ... marking server readyTest connectivity from the VM into the mesh
Still inside the vm1 container, set the SOCKS5 proxy that ztunnel exposes on
port 15080 and curl a mesh service:
About — what this does & why
What: Exports ALL_PROXY=socks5h://127.0.0.1:15080 so curl sends its requests via ztunnel's local SOCKS5 listener, then calls productpage by Kubernetes short name and by the mesh-internal global hostname.
Why: ztunnel exposes its SOCKS5 listener as the simplest way to drive mesh traffic from a VM — anything routed through it is intercepted, mTLS-wrapped, and tunnelled to the east-west GW. The two hostnames show both local-cluster resolution and global (cross-cluster) failover from the VM's perspective.
# Inside vm1 container:
export ALL_PROXY=socks5h://127.0.0.1:15080

# Standard Kubernetes DNS name
curl productpage.bookinfo:9080/productpage

# Mesh-internal global hostname (if productpage is labelled solo.io/service-scope=global)
curl productpage.bookinfo.mesh.internal:9080/productpage
Both should return the Bookinfo HTML. The first uses the Kubernetes ClusterIP; the second routes through the east-west gateway to whichever cluster is serving productpage.
$CLUSTER1 to confirm
mTLS HBONE is being used — you should see src.identity set to the
vm1 service account SPIFFE URI.
kubectl --context=$CLUSTER1 -n istio-system logs ds/ztunnel | grep vm1Enrol the VM in the mesh
ztunnel running inside the VM connects to istiod, but the mesh doesn't know about
the VM as a workload until you register it. Three resources are needed: a
WorkloadGroup (the VM class), a WorkloadEntry (this specific instance),
and a ServiceEntry (makes vm1 reachable by name from inside the mesh).
The namespace also needs the ambient and network labels.
About — what this does & why
What: Labels the vm1 namespace ambient and on network=cluster1, captures the VM's Docker IP, then applies a WorkloadGroup (the VM class), a WorkloadEntry (this specific VM at $VM_IP), and a ServiceEntry that makes vm1.vm1.svc.cluster.local resolve to it.
Why: ztunnel running in the VM gets the mesh's view into the VM; this block does the inverse — registers the VM into the mesh so other workloads can address it as a named service. The topology.istio.io/network label is what tells istiod how to route to it (via east-west GW vs direct), and the WorkloadEntry serviceAccount field anchors the VM's SPIFFE identity for policy.
# Label the namespace for ambient and set its network
kubectl --context=$CLUSTER1 label namespace vm1 \
  istio.io/dataplane-mode=ambient \
  topology.istio.io/network=cluster1

# Get the VM's IP on the kind network
VM_IP=$(docker inspect vm1 --format '{{range .NetworkSettings.Networks}}{{.IPAddress}}{{end}}')
echo "vm1 IP: $VM_IP"

kubectl --context=$CLUSTER1 apply -f - <<EOF
apiVersion: networking.istio.io/v1
kind: WorkloadGroup
metadata:
  name: vm1
  namespace: vm1
spec:
  metadata:
    labels:
      app: vm1
  template:
    serviceAccount: vm1
    network: cluster1
---
apiVersion: networking.istio.io/v1
kind: WorkloadEntry
metadata:
  name: vm1
  namespace: vm1
spec:
  address: ${VM_IP}
  serviceAccount: vm1
  network: cluster1
  labels:
    app: vm1
---
apiVersion: networking.istio.io/v1
kind: ServiceEntry
metadata:
  name: vm1
  namespace: vm1
spec:
  hosts:
  - vm1.vm1.svc.cluster.local
  ports:
  - number: 9080
    name: http
    protocol: HTTP
  resolution: STATIC
  workloadSelector:
    labels:
      app: vm1
EOF
Verify the in-cluster ztunnel received the workload address:
About — what this does & why
What: Tails the cluster ztunnel logs from the last 30 seconds and filters for XDS "received response" lines.
Why: Confirms that istiod has pushed the new WorkloadEntry (as an istio.workload.Address) down to every ztunnel pod. If the count never increments, either the WorkloadEntry wasn't admitted (check the namespace's ambient label) or the in-cluster ztunnel isn't subscribing — and cross-mesh traffic to vm1 will be a black hole.
kubectl -n istio-system logs ds/ztunnel --context=$CLUSTER1 --since=30s | grep "received response"
# Look for: "type_url":"...istio.workload.Address","size":N  (N should increase)
Once enrolled, vm1 has a SPIFFE identity —
cluster.local/ns/vm1/sa/vm1 — issued by istiod, backed by the shared root CA,
and indistinguishable from any in-cluster pod identity.
To demonstrate this without breaking any existing mesh traffic, apply a targeted
DENY for vm1 only. All in-cluster bookinfo services keep talking
to each other normally — only the VM is blocked.
1. Apply the deny policy:
About — what this does & why
What: Applies an AuthorizationPolicy in the bookinfo namespace with action: DENY, matching the principal cluster.local/ns/vm1/sa/vm1.
Why: Targets only the VM's SPIFFE identity — every other caller (the in-cluster bookinfo services) is unaffected. DENY takes precedence over any ALLOW, so this is the right shape for "this workload must never reach these services" regardless of what else is in the policy graph. No firewall rules, no app changes — identity-based segmentation.
kubectl --context=$CLUSTER1 apply -f - <<EOF
apiVersion: security.istio.io/v1
kind: AuthorizationPolicy
metadata:
  name: deny-vm1
  namespace: bookinfo
spec:
  action: DENY
  rules:
  - from:
    - source:
        principals:
        - "cluster.local/ns/vm1/sa/vm1"
EOF
2. Verify vm1 is denied (run inside the vm1 container):
About — what this does & why
What: From inside the VM, curls productpage through ztunnel's SOCKS5 proxy — the same call that worked in VM STEP 6.
Why: Proves the DENY took effect at the dataplane: ztunnel on the destination side rejects the inbound HBONE with RBAC: access denied because the source identity matches the deny rule. The traffic never reaches the productpage pod — enforcement happens at the mesh edge.
ALL_PROXY=socks5h://127.0.0.1:15080 curl -s productpage.bookinfo:9080/productpage
# → RBAC: access denied
3. In-cluster services are unaffected — bookinfo still works from the browser.
4. Remove the policy to restore vm1 access:
About — what this does & why
What: Deletes the deny-vm1 AuthorizationPolicy from the bookinfo namespace.
Why: Restores the cluster to its known-good baseline before the traffic-simulation section runs. The next steps assume vm1 can reach productpage again.
kubectl --context=$CLUSTER1 delete authorizationpolicy deny-vm1 -n bookinfo
DENY takes precedence over any ALLOW — it cannot be overridden
by another policy. This is the right tool for "this workload must never reach these
services", regardless of what other policies exist. No firewall rules, no network
segments, no application changes — one policy on the mesh.
Simulate traffic
Run these to generate live mesh traffic so the Gloo graph has metrics to render.
vm1 → productpage (start / stop)
Start a continuous load from vm1 into the bookinfo mesh:
About — what this does & why
What: Launches a long-running curl pod (vm1-load) in the bookinfo namespace that calls vm1.vm1.svc.cluster.local:9080 once a second.
Why: Generates a steady cross-workload edge (pod → VM via the ServiceEntry) so the Gloo Platform graph has live metrics to render. Without ongoing traffic the dashboard edges go grey within a few seconds.
kubectl run vm1-load --image=curlimages/curl -n bookinfo --context $CLUSTER1 \
  -- sh -c 'while true; do curl -s -o /dev/null http://vm1.vm1.svc.cluster.local:9080/; sleep 1; done'
Stop it:
About — what this does & why
What: Deletes the vm1-load pod that was producing the steady curl traffic.
Why: Stops the synthetic load so the cluster goes back to idle. The pod was started with kubectl run (not a Deployment) so a single delete tears it down for good.
kubectl delete pod vm1-load -n bookinfo --context $CLUSTER1ratings → httpbin.org via egress gateway
Send traffic through the egress gateway from the ratings pod (allowed by the AuthorizationPolicy):
About — what this does & why
What: Resolves the current ratings pod name, then execs into it and curls httpbin.org/get through the egress waypoint.
Why: Drives a live edge on the Gloo graph from ratings through egress-gateway out to httpbin.org — the workload identity matches the allow rule from earlier, so it succeeds and shows up as a green edge.
kubectl exec -it $(kubectl get pod -l app=ratings -n bookinfo --context $CLUSTER1 \
  -o jsonpath='{.items[0].metadata.name}') \
  -n bookinfo --context $CLUSTER1 -- curl -s httpbin.org/get
Confirm reviews is blocked (no egress policy allows it):
About — what this does & why
What: Same shape as the previous command, but execs into a reviews pod instead of ratings and curls the same external host.
Why: The AuthorizationPolicy only names bookinfo-ratings; reviews is implicitly denied. The call gets blocked at the egress waypoint, which surfaces as a red/denied edge on the Gloo graph — visual proof that egress policy is identity-aware, not network-aware.
kubectl exec -it $(kubectl get pod -l app=reviews -n bookinfo --context $CLUSTER1 \
  -o jsonpath='{.items[0].metadata.name}') \
  -n bookinfo --context $CLUSTER1 -- curl -s httpbin.org/get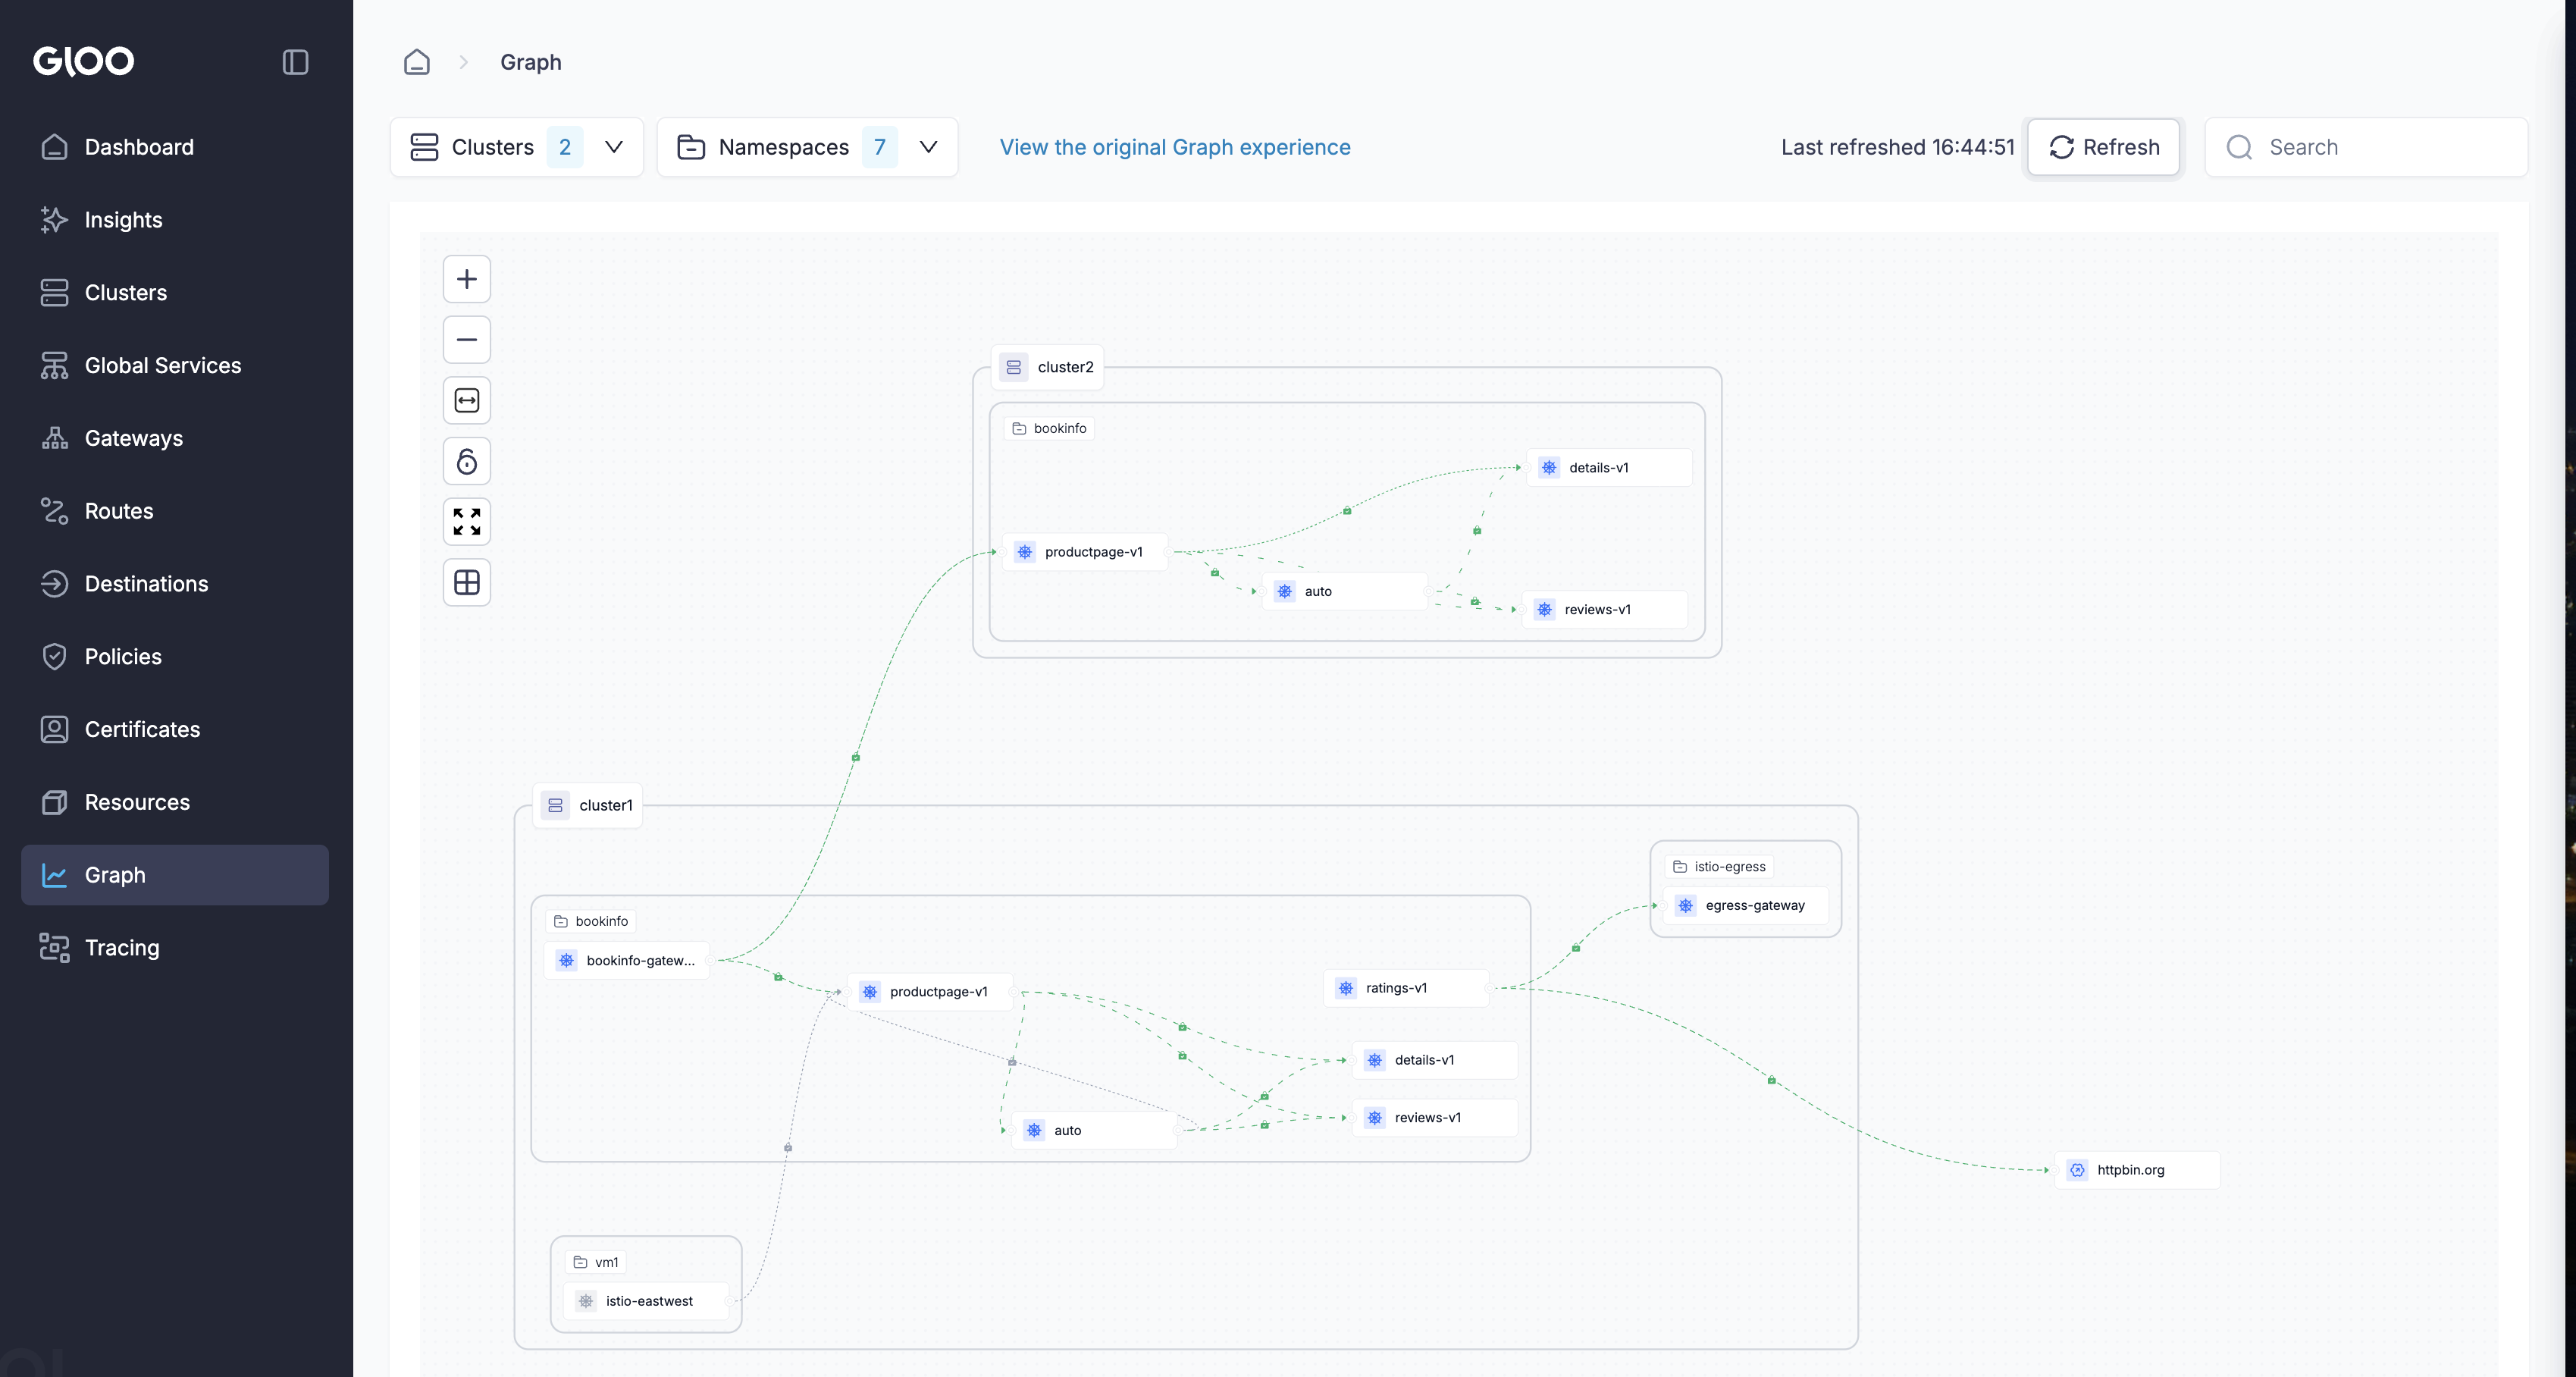
cluster1 (bottom): bookinfo, vm1 (with istio-eastwest), and egress-gateway routing ratings-v1 traffic out to httpbin.org.
cluster2 (top): productpage-v1, details-v1, reviews-v1 reachable cross-cluster via mTLS. Lock icons on every edge confirm mutual TLS end-to-end.
Teardown: delete the clusters
When you're done, delete both kind clusters using the same variables you set during setup. Each command removes the cluster, its kubeconfig context, and the associated Docker networks.
kind delete cluster --name "${CLUSTER1#kind-}"
kind delete cluster --name "${CLUSTER2#kind-}"
Confirm nothing is left:
kind get clusters
If you also want to remove the shared local registry:
docker rm -f kind-registry
Resources
- rvennam/ambient-multicluster-workshop — the upstream workshop this adapts
- ambientmesh.io — Istio Ambient documentation
- kind.sigs.k8s.io — kind documentation
- metallb.io — MetalLB documentation
- Source on GitHub